Methods to Import PST File into Exchange Server Online
Microsoft Exchange Server is a platform for email, Calendaring, Scheduling, and contact. It utilises the Windows Operating System for business use. This platform is known for its good availability.
Emails available on Exchange Server can be accessed by different services such as POP3, IMAP4. Many companies are migrating to the Exchange Server because of its advanced facilities.
![]()
![]()
Why Using Exchange Server is Beneficial?
- Exchange Server Protect your crucial data and notify users of internal compliance policies with Data Loss Prevention (DLP) abilities.
- Store all data in one place with the help of exchange archiving, large mailboxes, and retention policies.
- It makes it easier to manage the team and project communications. Users can see old communication related to the project as soon as they join.
- Provides facility to move to the cloud and manage the deployment.
- Enable users to get together on projects and share information effortlessly.
Prominent Solutions to Import PST to Exchange Server
Here is the stepwise procedure to import PST to the Exchange server
Solution 1: Network Upload Method
- Upload PST file to the cloud platform
- Create a Job and exchange server data
- Install Azure Azcopy Tool using SAS URL
- Create a CSV file to shift PST file to exchange online
- Create PST migration mapping file
Step 1: Upload PST file to the cloud platform
- First of all, login to https://protection.office.com/ using valid credentials.
- Then move to the Security & Compliance Center>Data Governance>Import.
- Click on +New import Job. It helps to upload PST files.
- Type the name for the process and click the Next button.
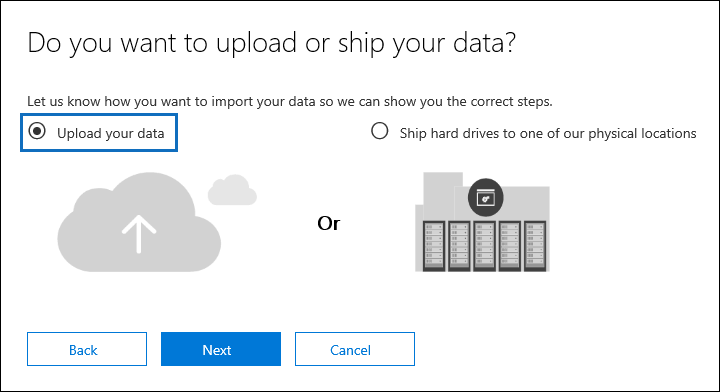
- In the next wizard, click on the “Upload your data” then tap on the Next button.
Step 2: Create a Job and Exchange Server Data
After uploading the PST file, create a job by tapping on New Import Job. Enter the name of the Job and hit the Next button.
Pick Upload Your Data option and on the Next button.
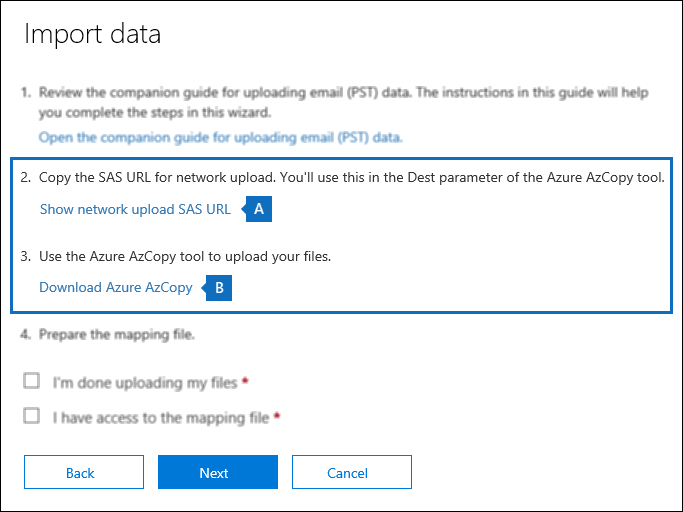
Step 3: Install Azure Azcopy Tool using SAS URL
- Click on Show Network Upload SAS URL. After displaying of SAS URL, tap on the “Copy to Clipboard”. Then paste it into the file.
- Tap on the Download Azure Azcopy to Download and launch the Azcopy tool.
- Now, type the following command to launch the software.
AzCopy.exe/Source:\\Network Path /Dest:”SAS URL” /V:give location to save log file\AzCopy.log /Y
- Then, click the Enter key.
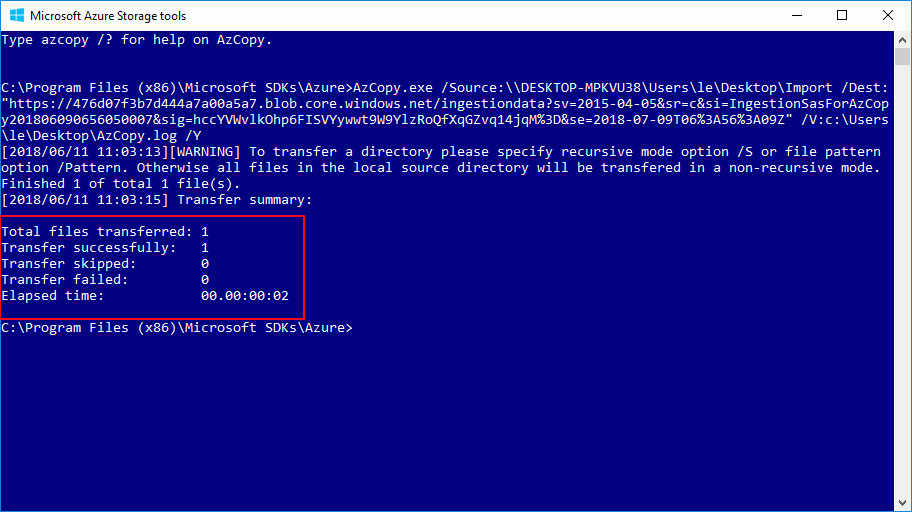
- Finally, the PST file will get uploaded successfully on the Azure Azcopy Application.
Step 4: Create a CSV file to Shift PST File to Exchange Online
Once you save data into the Azure application, create a CSV file to export PST to the Exchange server.
Move to the import Data window and pick the options “I’m done uploading my files” or “I have access to the mapping file”. Then, click on the Next button.
Step 5: Create PST Migration Mapping File
After displaying the new window, you need to upload the created CSV file. Here, click on the Select mapping file option, tap on the validate button, and hit the save button.
Finally, your data has successfully shifted to the Exchange server.
Solution 2: Import PST File into the Office 365 Account– Drive Shipping
Office 365 has provided its method to migrate Outlook data files into Office 365 mailboxes. It will work after downloading the secure storage key and PST import tool.
Following are the steps to involved in drive Shipping Method:
- First of all, download the secure storage key and .pst import tool.
- Then, copy the PST files to the hard drive.
- Now, create the PST import mapping file.
- Next, create the PST import Job in Microsoft 365.
- Then, ship the hard drive to Microsoft.
- Finally, filter the data to start the import job.
The major drawback of this method is that it takes weeks to export PST files to Office 365. If there is any urgency to exporting the files, then this method will not work.
Solution 3: Powershell Method
- To use the Power shell command, you need to open the Exchange Management Shell.
- Before permitting the import process, you have to permit Import/Export to an individual or group.
- Give a path to the PST file to export the PST file to exchange.
- Run the following command to export PST mailbox to Exchange Server.
“User_Mailbox_Name” -FilePath “UNC_shared_File_Path”
- Confirm PST mailbox is imported to the Server or not!
- Finally, open the Exchange Server to find the imported mailbox data.
Solution 4: Export PST to Exchange Server using PST Exporter Tool
The above solutions are time-consuming and complex to process. In this case, you need a trusted and secure solution to transfer PST files to Office 365. PST Converter Tool will help you to overcome these issues and migrate your PST files to Office 365.
This tool can import PST file to Gmail, Office 365, Outlook Web etc., and can also convert PST to HTML, EML, EMLX, AOL, PDF, MBOX, PNG, TIFF, DOC, DOCM, TXT, CSV, and OST. It is compatible with almost all the major versions of MS Outlook.
Final Words
We have discussed different solutions to import PST file into Exchange Server. Here, we have described the fundamentals of Live Exchange and its related benefits also. As we know, the above three methods are complicated to process for novice users. Even, missing a single step can lead you to lose all your data. Therefore I would like to recommend you to opt for PST Converter Tool for PST migration. This tool is highly secure and efficient to use.
I hope it will work for you. You can ask your further queries. Kindly give your valuable feedback, it will be highly appreciated.