While using Microsoft Outlook, encountering an error message is entirely useless and very frustrating. If there’s any sort of problem, whether in Outlook or in its PST file, you’re likely to encounter an error message. Error 0x80040900 is one of the most common Outlook errors. In this article, we’re going to discuss the most common reasons for this Outlook error message. Also, we’ll learn how to troubleshoot Outlook error 0x80040900.
Have you ever faced an Outlook error message? Do you remember how you resolved it? Microsoft Outlook is undoubtedly a popular email client. However, it ain’t immune to errors and other issues. What would you do if you encounter an error while using the Outlook client? Most of the time, Outlook users resolve the errors simply by restarting Outlook or the computer. But sometimes this trick fails to resolve the actual problem. In such a situation, you should start looking into the problem a bit more deeply.
Outlook Error 0x80040900
How would you deal with a situation in which you’re unable to send or receive emails through Outlook?
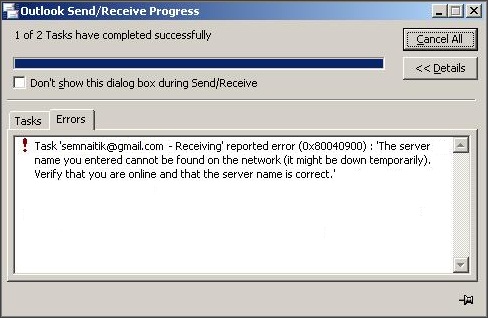
Sometimes even a small issue can cause Outlook to throw an error message. Error 0x80040900 is a common error that occurs when the mail server name or ports are incorrectly specified in the Outlook Account Settings. Or maybe you can’t reach the mail server due to the poor or no Internet connection. In any of these situations, you may receive the following Outlook error message during the Outlook Send/Receive operation:
By default, the error message reads,
Task ‘semnaitik@gmail.com – Receiving’ reported error (0x80040900): ‘The server name you entered cannot be found on the network (it might be down temporarily) Verify that you are online and that the server name is correct.’
Troubleshoot Error 0x80040900
It ain’t easy to detect the exact reason for this Outlook error message. However, below are the most possible reasons due to which the Outlook error 0x80040900 occurs:
No or poor Internet connection;
Incorrect mail server settings;
Issues with Antivirus & Firewall settings;
Corrupt PST file; etc.
First, you need to check the Internet connection before you can try anything else. Make sure the network connection is active. Or you may try to fix this issue by rebooting the Internet router. If the problem doesn’t seem to be associated with the Internet connection, you should check the mail server settings. Maybe they’re incorrect.
Check Mail Server Settings
You need to find the required settings in order to set up your email account properly in Outlook. You need to know the following things:
Incoming Mail Server’s type: POP3 or IMAP
Incoming Mail Server’s Name/Address
Outgoing Mail Server Name/Address
Incoming Mail Server Port number
Outgoing Mail Server Port number
If the Outgoing Mail Server requires Authentication
Are the Mail Servers uses SSL?
Now open the Outlook Account Settings, and verify that the email account settings are correct:
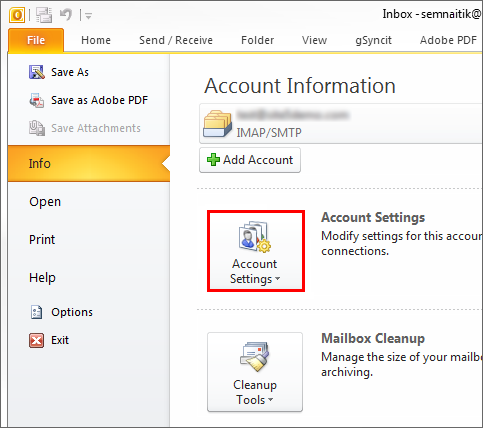
Step 1: First, launch Microsoft Outlook.
On the taskbar, click the File tab >Info>Account Settings.
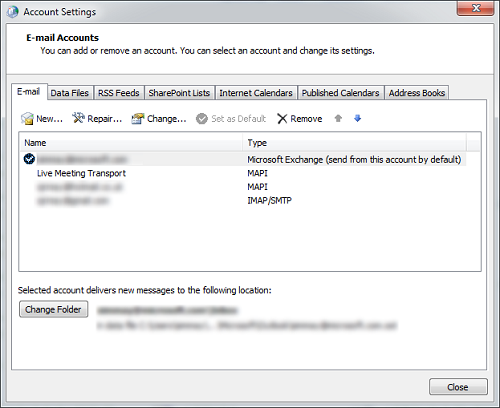
Step 2: On the Account Settings window, click the E-mail tab.
Now double-click the email account to check the account settings.
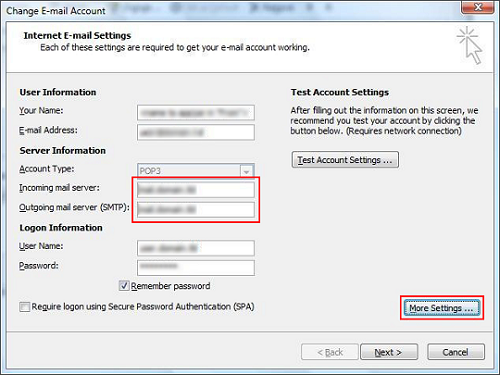
Step 3: Make sure that you’ve defined the correct account settings like Incoming and Outgoing Server name(s).
Also, you need to click the More Settings… button.
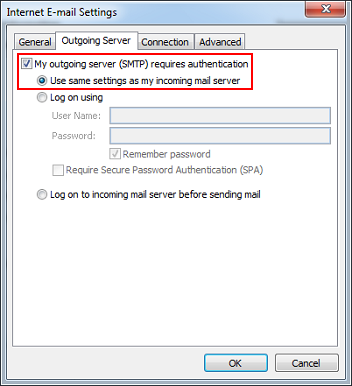
Step 4: Click the Outlook Server tab.
If your outgoing mail server requires authentication, check the corresponding box.
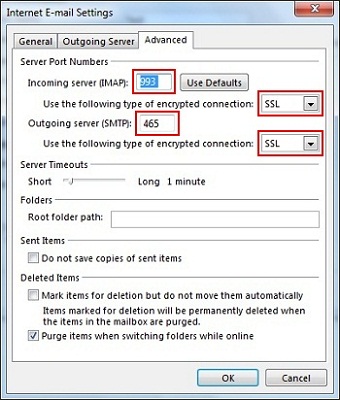
Step 5: Now click the Advanced tab.
Here you need to verify that the specified ports and SSL settings are correct.
After that, click OK and close all the open windows. Now launch Microsoft Outlook again.
Check Antivirus & Firewall Settings
If the scanning feature of your Antivirus program is enabled, you need to disable it temporarily to fix this issue. Also, you should check the Firewall settings to ensure that the email server ports you’re using don’t get blocked from the Firewall program.
If you’re still facing the same issue, you should try these tricks:
Remove the email account and add it again.
Repair Microsoft Office installation. To do that, follow these simple steps:
Go to Control Panel>Programs and Features.
Now find the Microsoft Installation in the list. Right-click it, and click Change.
Then select the Repair option.
If nothing works for you, maybe the Outlook data file is corrupt and you need to repair it. Microsoft provides a freeware utility, the Inbox Repair tool, to repair PST file. It’s commonly known as the scanpst utility. By using the scanpst utility, you can scan corrupt PST file and repair it. But keep in mind that the Inbox Repair may fail or not work if file corruption is severe. In such a situation, you should use a professional Outlook Recovery solution.
There are many vendors on the online marketplace which provide such Outlook Recovery software. SysInfoTools is one of them. Its PST Repair tool can repair PST file without requiring any prior technical expertise. Any technical or non-technical user can use this Outlook Recovery software with ease. It provides a wide range of features with an excellent performance at an affordable price. It’s considered one of the best Outlook Recovery software till date. However, you should download its free demo version before purchasing the software. By using the demo version, you can check the preview of the recoverable data prior to saving. And if you’re satisfied with the results, then only you should purchase the software.
Conclusion
In this article, we’ve discussed the Outlook error 0x80040900 in detail. Also, we’ve learned how to resolve this particular Outlook error message. Since corruption is considered one of the main reasons for error 0x80040900, you must repair PST file. There are two ways to do that: either you can use the Inbox Repair tool or you can use a 3rd party PST Repair tool.