Microsoft Outlook is a popular email client among many corporate organizations and home users. It comes with Microsoft Office suite as well as a separate application. It’s very common to receive an Outlook error message. In this article, we’ll discuss Outlook error 0x8004010f, one of the most common Outlook errors. I’ll show you why this Outlook error message occurs and how to fix it without any hassle.
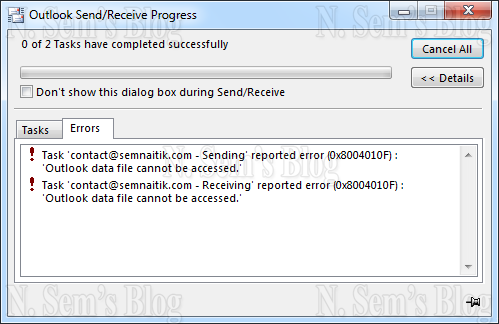
Microsoft Outlook problems are always very annoying for users. Outlook error 0x8004010f is one of the most common Outlook errors confronted by many Outlook users. You’re likely to receive this Outlook error message during the “Send/ Receive” operation.
Sending reported error (0x8004010f): Outlook data file cannot be accessed.
Receiving reported error (0x8004010f): Outlook data file cannot be accessed.
The two most common reasons for this Outlook error message are:
If the Outlook profile is corrupt;
Or, if the Outlook folders are moved across drives.
How to fix Outlook Error 0x8004010f?
If you’re frequently encountering this Outlook error message, you can easily resolve it. If you’re using Microsoft Outlook 2010 or 2013, you need to create a new Outlook profile by using the POP3 or IMAP email account. Follow the simple steps shown below:
Microsoft Outlook 2010
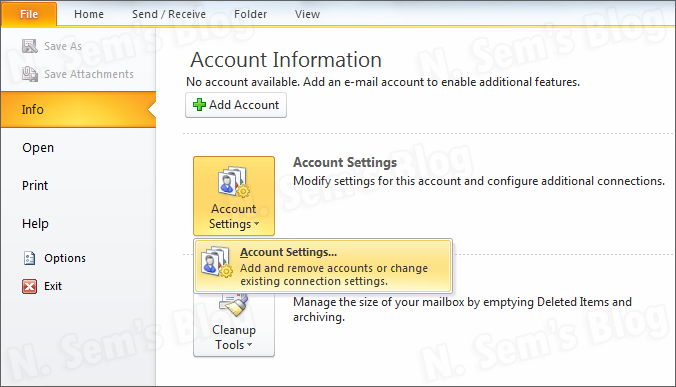
Step 1: Launch Microsoft Outlook on your system.
Go to the Account Settings.
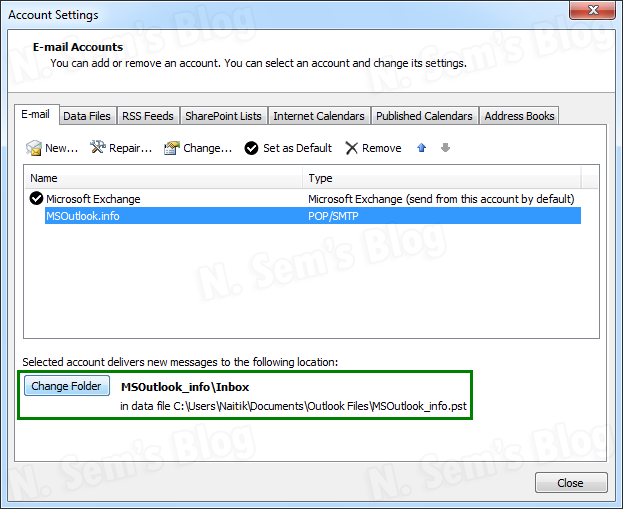
Step 2: On the Account Settings dialog box, click the Email tab. Now select the account in which you’re receiving the error message.
Click the Change Folder button.
Step 3: On the New E-mail Delivery Location dialog box, click the New Outlook Data File… button.
Step 4: Name this new Outlook data file and click OK.
Step 5: Now expand this new Outlook data file, and select the subfolder Inbox. Click OK.
Step 6: On the Account Settings dialog box, click the Change Folder button again.
Step 7: Now select the newly created Outlook data file, and define a folder where you need to store email messages. Click OK.
Step 8: Now close the Account Settings dialog box, and tap on “Send/Receive” button.
Important note: Before you can execute the above trick, make sure you’re not connected to Microsoft Exchange Server.
Microsoft Outlook 2013
If you’re using Microsoft Outlook 2013, you can resolve this Outlook error 0x8004010f by creating a new Outlook profile. Locating the default Outlook data file is the initial task. And then, you need to create a new Outlook profile in this way:
Use Auto Account Setup
Step 1: First, click Start (Win button) and go to the Control Panel. Click the Mail in the list.
Step 2: On the Mail Setup – Outlook dialog box, click Show Profiles… button.
Step 3: On the Mail dialog box, click the Add… button in the General tab. This will launch the New Profile dialog box.
Step 4: Enter a new name for this new Outlook profile and click OK.
Step 5: On the Add New Account dialog box, provide the information like name, email address, and password. Click Next to continue the process.
Step 6: Within a few minutes, the process will be completed successfully. Finally, click Finish.
Use Manual Account Setup
If you want to configure account settings manually, follow the steps 1 to 4 (aforementioned). And then, follow the steps given below:
Step 5: On the Add New Account dialog box, click the Manually configure server settings or additional server types box. Click Next to continue the process.
Step 7: Under Choose Service, click the Internet E-mail box in the list. Click Next to continue the process.
Step 8: Now enter the information (account details). After that, click Test Account Settings… button for testing the account.
Step 9: Then, choose Existing Outlook Data File under the “Deliver new messages to:” option. Click Browse button.
Step 10: On the Open Outlook Data File dialog box, select the Outlook data file. Click OK.
Step 11: Now click Next to continue the process.
Step 12: On the Test Account Settings dialog box, click Close. Finally, click Finish.
This will create the Outlook profile successfully. Now you need to set up this newly created account as the default profile of your Outlook client:
Click the General tab on the Mail dialog box.
Now choose Always use this profile option, and select the profile you created earlier.
Click Apply > OK. And then, close the Mail dialog box.