OLM to PST Conversion Manually – A Comprehensive Tutorial
While switching from one email client to another, email conversion becomes a vital need. The Outlook for Mac and Windows Outlook support different file formats. If you’re planning to switch from Mac Outlook to Windows Outlook, you must convert OLM to PST format. In this post, I’ll show you how to convert OLM to PST format manually.
Microsoft provides its Outlook application not only for Windows but also for Mac. Microsoft Office Outlook 2011 for Mac is pretty similar to the Windows Microsoft Outlook program. The only difference is the data files used by these programs to store the mailbox data. You’re quite familiar with PST or personal storage table, an Outlook data file of Windows Outlook. But do you know in which format Outlook for Mac stores the mailbox data? Well, the answer is OLM (Outlook for Mac) file in which your mailbox data are stored by Outlook for Mac.
Always keep in mind that there’s no way to open an OLM file in any version of Windows Outlook. It only supports PST and MSG file formats. Even it’s not recommended to import or export the OLM files directly to Windows Outlook. Importing the OLM file from Mac Outlook to Windows Outlook in a wrong way can harm the file severely and make it unusable or corrupt. Later in this article, I’ll show you the right way to import email messages and other data from OLM to PST file format. But before that, let’s
Need for OLM to PST conversion
Before discussing how to import OLM to Outlook, let’s find out the reasons for OLM to PST conversion. I mean why we need to import OLM to Windows Outlook.
- You were using Outlook for Mac previously, but now you’re using Windows Outlook. You need to use OLM files in your Windows Outlook. What will you do?
- Or, you receive an OLM file from your friend or a client. But you’re using Windows Outlook. You’re unable to view the content and information of the file since you don’t have Outlook for Mac.
Mac Outlook to Windows Outlook
There might be any reason for OLM to PST conversion. And the best solution is always a professional OLM Converter tool. It can successfully convert OLM to PST format so that you can access the old mailbox content with no ease. OLM to PST Converter is a commercialware tool, i.e. you must purchase its license. But if you’re looking for a free solution, you should try an easy DIY trick that requires no 3rd party tool. Though there’s no guarantee that the trick will surely work for you, there’s no harm in trying it. I’ve divided the complete trick into five different parts:
Setup IMAP Email Account
It’s very simple to create or set up an IMAP account, i.e. it only requires 3 simple steps. Gmail is the best option for creating or setting up an IMAP Mail account. So you can start this process with the creation of an email account in Gmail. Once the account is created, just log into it and follow the steps shown below:
Step 1: Click the Gear button at the top on the right side.
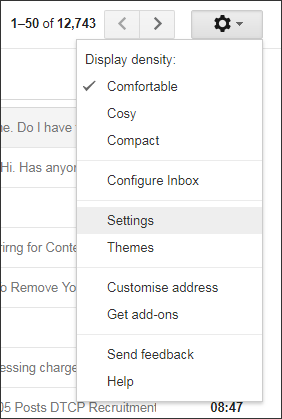
Click Settings to go to the settings page.
Step 2: On the settings page, click Forwarding and POP/IMAP tab at the top.
Step 3: Check your IMAP status. If you find it disabled, enable it. Also, define other settings.
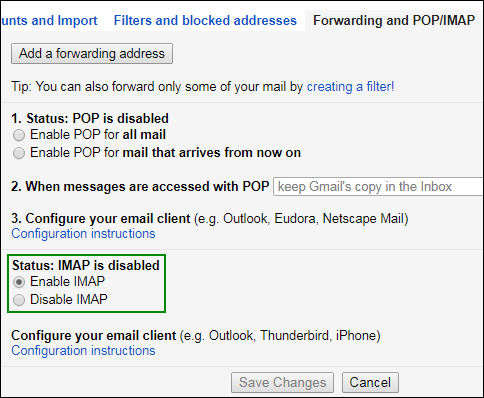
And then click the Save Changes button.
This will create an IMAP mail account. Now you need to setup Mac Outlook with your IMAP mail account. Follow the steps given below to do this action:
Step 1: First, open the Outlook for Mac program.
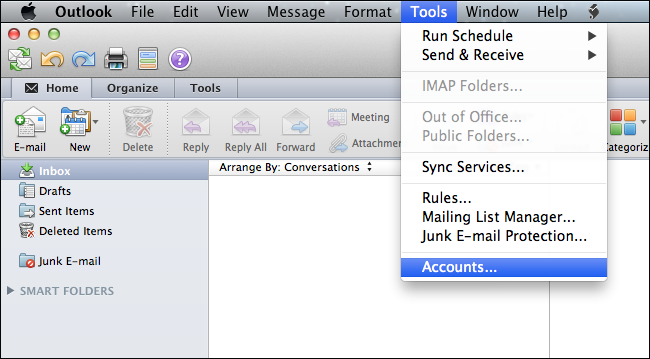
On the main menu, go to Tools > Accounts.
Step 2: On the Accounts window, click Email.
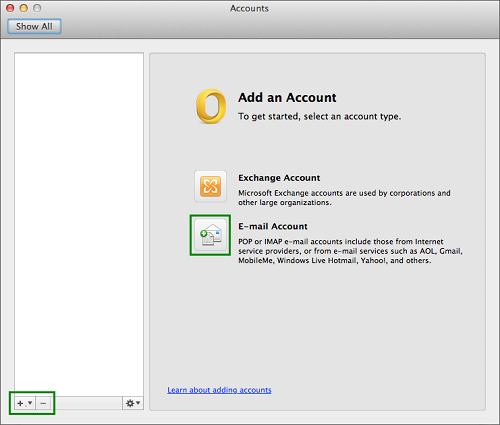
Step 3: Now you need to enter your account information. Type your Email address and Password.
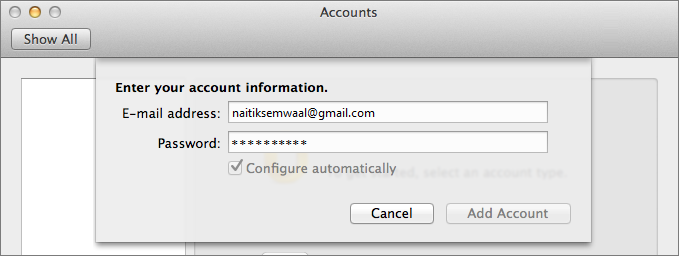
Then click the Add Account button.
Note: If you want to configure the account settings manually, uncheck the Configure automatically option.
Step 4: This will successfully add the IMAP mail account, and you’ll see your IMAP mail account on the Mail tab.
Create a Gmail Label
After this, you need to create a Gmail label to synchronize it with the Mac Outlook. To do this, just follow the steps given below:
Step 1: First, log in to your Gmail account.
Step 2: Click the Gear button on the top on the right side.
Click Settings to go to the settings page.
Step 3: On the Settings page, click the Labels tab at the top.
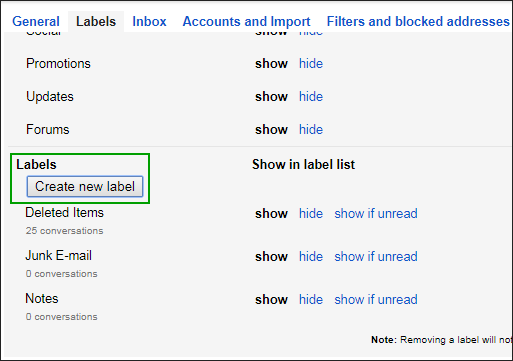
Now click the Create new label button.
Step 4: On the New Label dialog box, enter a new label name.

Then click Create.
Note: Make sure the label is shown and the Show in IMAP box is checked.
Step 5: Right after this, you need to go to your Mac Outlook and update the IMAP mailbox by clicking on the Send/Receive button.
Move Emails from Mac Outlook to IMAP Mailbox
It is the main part of this process in which your emails and other mailbox data of an OLM file will be moved or transferred to your IMAP mailbox. Follow the steps shown below:
Step 1: First, launch Outlook for Mac on your system.
Step 2: Right-click any mailbox item that you want to move. Click Move > Copy to Folder.
Step 3: Now type the name of your IMAP folder and click Copy.
Step 4: After copying the selected mailbox data to IMAP mailbox, you need to update your Mac Outlook IMAP folder by clicking the Send/Receive button. Or you may also update it by refreshing the folder on Gmail.
Now you can see all the copied emails or other mailbox data have been synchronized to the IMAP mailbox folder. Here you need to move all the emails or other mailbox data from the IMAP mailbox folder to Windows Outlook. You need to set up the very same IMAP Mail account to the Windows Outlook. Now drag your IMAP mailbox folder data to your Windows Outlook Inbox Folder.
Major Drawbacks
- Little risky (take backup of your OLM files before using this solution);
- Time-consuming; Requires a sound technical knowledge;
- Ineffective if OLM files are corrupt; etc.
These are few common drawbacks of this manual solution to import OLM to Outlook. There’s one of more thing you can use here, a professional OLM Converter tool for converting OLM to PST format.
Users might also be interested in MBOX to PST Conversion Manually – An Easy Tutorial
Professional OLM to PST Converter
SysInfoTools Software provides the smartest OLM Converter tool to import OLM to Outlook client. There’s no need to have any prior technical expertise to use this software. Any tech-savvy or a novice user can use it with ease. It can successfully convert OLM to PST file format without causing any alteration to the original mailbox content. Even the original OLM files are remained intact after a successful conversion. Unlike the manual trick, this tool can convert OLM files even if they’re corrupt. Other than PST file format, you can save OLM files’ content into MBOX, EML, and MSG format.
So overall this software best fits your needs if you want to convert OLM to PST file format. Before you can purchase the software, you should download its demo version for free evaluation.